Walk In Wardrobes NZ Homeowners Are Choosing Right Now
You want a walk in wardrobe that looks clean, fits your space, and makes every morning easier. I spend my time helping homeowners plan storage that works with real floor plans and real budgets. The guidance below is based on layouts that build well in New Zealand homes, common product options, and lessons from successful installs.
If you are browsing walk in wardrobes nz, focus on modular systems that adapt to your room and can be trimmed on site. That gives you a custom look without custom joinery costs. I will show you what is trending now, how to size your space, layouts you can copy, and how to choose a wardrobe system that stays flexible as your needs change.
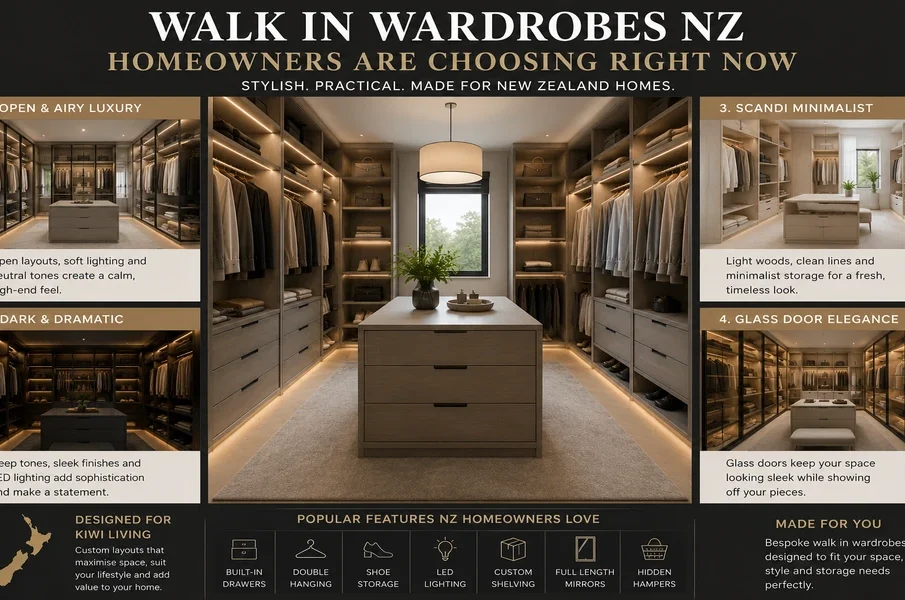
What NZ Homeowners Are Choosing Right Now
The strongest trend is modular fit outs that balance drawers, hanging, and open shelves. You get order without the price of full cabinetry.
- Double hanging zones for shirts, blouses, and trousers
- One or two tower units with drawers for daily items and open shelves for stacks
- Dedicated shoe storage, often low-level shelves or a pull-out shoe tray near the entry
- A long top shelf around the room for seasonal items
- Neutral finishes like matte white or light wood tones that match most interiors
- Adjustable rails and shelves, because family needs change over time
- Simple, low-heat LED strip or puck lighting to brighten corners
These walk in wardrobe designs keep the footprint tidy and the budget controlled.
Plan Your Walk In Wardrobe The Right Way
I suggest planning around daily movement. Start at the doorway and walk the path you take each morning.
- Place drawers close to the entry for underwear, socks, and T-shirts
- Keep long hanging to one wall so gowns and coats do not block the aisle
- Put a mirror and a small surface or stool near natural light if you have it
- Use the highest shelves for suitcases, spare duvets, and out-of-season clothing
- Keep hampers and dry-cleaning hooks near the exit
This flow lets you move fast and avoids clutter on the floor.
Get The Size Right
Good function depends on the aisle. Most frustrations come from aisles that are too tight or rails that project too far.
- Ideal clear aisle: 900 to 1000 mm
- Absolute minimum aisle for a single user: 800 mm
- Hanging depth required: 550 to 600 mm including hangers
- Top shelf above rail: 300 to 350 mm to slide hangers easily
- Drawer clearance: allow at least 500 mm in front of a drawer for comfortable access
Typical room shapes work like this:
- L-shape: efficient for small rooms and gives a clear turning zone
- U-shape: great for larger spaces, with a drawer tower on the back wall
- Galley: strong for long narrow rooms with storage on one side and a mirror on the other
If you are unsure about walk in wardrobe size, tape the footprint on the floor and practice opening drawers and standing in front of rails.
Small Walk In Wardrobe Ideas That Maximise Every Centimetre
You can get a very workable fit out in compact spaces if you design with intent.
- Use one drawer tower and keep other walls for hanging
- Add a pull-out pants rack to free up hanging space
- Run a continuous top shelf around the room for bulky items
- Use adjustable shelves at 200 to 250 mm spacing for shoes and folded knitwear
- Choose 400 mm deep towers if your room is tight
- Hang hooks behind the door for bags and hats
- Mount a mirror on the back of the door to save wall space
These small walk in wardrobe ideas keep access clear and stop you from overfitting the space.
Smart Fit Out Checklist
Build your walk in wardrobe fit out from a clear parts list. This keeps you on budget and avoids mid-install surprises.
- Towers: 1 to 3 units depending on room size
- Drawers: soft-close if possible, mix shallow and deep
- Hanging rails: one long-hang, at least two double-hang zones
- Shelves: adjustable boards for shoes and folded stacks
- Accessories: pull-out shoe trays, pants racks, tie or belt racks, laundry hamper
- Lighting: LED strips or pucks, wired or rechargeable
- Ventilation: ensure airflow to reduce moisture
- Power: one outlet for a garment steamer or hair tools
Why I Recommend Kitset Wardrobes For NZ Homes
I recommend Kitset Wardrobes because they combine flexibility, speed, and fair pricing in a way that suits New Zealand homes.
- Customisable layouts: you can choose pre-designed configurations or submit your room sizes for a tailored quote
- Online 3D planner: you can visualise your walk in wardrobe ideas nz before buying
- Trim-to-fit parts: top shelves and rails arrive oversized, which makes site adjustments simple
- Flat-pack convenience: parts, fixings, and instructions are included for DIY installation
- Fast delivery and NZ-wide service: many orders ship within days, with pick-up options in Auckland
- Modular growth: start with a basic layout, then add towers, drawers, and accessories later
- Strong value: you get durable wardrobe systems nz without the cost of bespoke joinery
They also cater to both reach-in and walk-in spaces, which helps if you plan to match a master suite with secondary bedroom storage.
Simple Design Playbooks You Can Copy
Use these starting points and adjust to your measurements.
- One 450 mm deep tower with 4 drawers and one adjustable shelf
- One wall double hanging, the other wall long hanging
- Continuous top shelf around both walls
- Hook rail behind the door
- Two tower units flanking the back wall with 5 to 6 drawers total
- Double hanging on side walls, long hanging near the entrance for coats
- 4 to 5 tiers of shoe shelves under the side rails
- LED strip lighting under the top shelves
- Storage on one side only to keep a 900 mm aisle
- One tower with drawers centered, double hanging left, long hanging right
- Full-length mirror opposite the tower
- Ceiling-high shelving above all sections
These layouts use common component sizes and keep clearances comfortable.
Installation Notes For DIY Confidence
I see the best results when homeowners follow a simple setup routine.
- Measure twice, sketch once, and confirm wall squareness
- Mark studs and preferred heights with a pencil line all around
- Pre-drill and level the tower carcasses before fixing to the wall
- Trim top shelves and rails to length with a fine-tooth saw
- Fix rails into solid timber or use high-quality anchors if studs are not in the right place
- Adjust doors and drawer fronts at the end for clean gaps
- Vacuum as you go to avoid dust scratches on panels
Basic tools do the job well: drill, level, stud finder, square, and a fine-tooth handsaw or track saw.
Budget Tips That Still Look Great
- Start with towers and hanging, then add specialty accessories later
- Use open shelves for shoes instead of complex pull-outs if you need to save
- Keep finish choices simple and consistent through the room
- Standard heights and widths reduce cutting time and cost
- Design once and stick to it. Changes on site slow you down
Your Next Steps
- Measure your space and decide on L, U, or galley
- List your storage needs by type: long hang, double hang, drawers, shelves, shoes
- Choose a trim-to-fit modular system you can install with basic tools
- Price a base layout and stage extras over time
If you want proven walk in wardrobe designs with local support, Kitset Wardrobes offers practical systems, an easy planning process, and fast NZ delivery. Use these guidelines, lock in your layout, and build a walk in wardrobe that serves you every day.